Learn to use C/C++ code on Android with the NDK and CMake.
Android Wavetable Synthesizer Tutorial Series
- App Architecture
- UI with Jetpack Compose
- ViewModel
- Calling C++ Code From Kotlin with JNI (this one)
- Playing Back Audio on Android with C++
- Wavetable Synthesis Algorithm in C++
Introduction
Welcome to the 4th part of the Android wavetable synthesizer app tutorial!
In this tutorial series, we want to design and implement a synthesizer app on Android using all the modern technologies and best practices.

Figure 1. Graphical user interface of the synthesizer app we are building.
In the first part of this tutorial, we discussed the architecture of our app.
In the second part of this tutorial, we discussed how to create its user interface (UI) using Jetpack Compose.
In the third part of this tutorial, we implemented the bridge between the UI and the core logic of our app using the ViewModel.
In this part of the tutorial, we will learn how to call the C++ audio-processing code from Kotlin.
Table of Contents
- Introduction
- Why Do We Need to Call C++ Code For Audio Processing?
- How Can We Call C++ Code From Kotlin?
- NativeWavetableSynthesizer Class
- Native C++ Code
- wavetablesynthesizer-native-lib.cpp
- WavetableSynthesizer C++ Class
- Log.h header
- CMakeLists.txt File
- App’s build.gradle Adjustments
- MainActivity.kt Adjustments
- Testing
- Summary
Why Do We Need to Call C++ Code For Audio Processing?
You may be wondering why we cannot simply do the audio processing in Kotlin or Java.
We could if our processing was very basic. However, audio processing is most efficient if integrated directly with the audio driver. Furthermore, audio processing runs most efficiently if compiled directly to the machine code. These both properties exclude Java or Kotlin from the group of considered languages.
From Google Security Blog:
Lower levels of the OS require systems programming languages like C, C++, and Rust. These languages are designed with control and predictability as goals. They provide access to low level system resources and hardware. They are light on resources and have more predictable performance characteristics.
Currently, it is easiest to write Android audio code in C++ thanks to the Oboe library (which we will introduce in the next part of the tutorial).
But who knows, maybe it will soon be easier in Rust 😉
How Can We Call C++ Code From Kotlin?
Thanks to the Java/Kotlin interoperability, it is quite easy to call C or C++ functions from Kotlin.
For this, we need 2 parts:
externalfunctions in Kotlin, and- Java Native Interface (JNI) bridge.
External functions in Kotlin are functions which are declared in Kotlin modules and can be called in Kotlin but which are defined in C or C++ code. This concept is similar to header file/source file separation in C and C++. You may also think about the extern keyword in C/C++, which specifies that a global variable, a function, or a template declaration has external linkage.
Java Native Interface is a programming framework that allows a programmer to call C/C++ functions from Java and Java methods from C/C++.
In this tutorial, you will learn how to call C/C++ functions from Kotlin using these two components.
To call C++ code from Kotlin you need to:
- Define the desired functions in a Kotlin module as
externalfunctions. - Create a source C++ file.
- Write the definitions of the previously declared functions in C++ using appropriate function signatures defined by JNI.
- Create a build script for the C++ file. This is typically a CMakeLists.txt file with a shared library target.
- Adjust the build.gradle script file.
- Load the shared C++ library statically in Kotlin.
As this seems quite complex, the best thing we can do is to go through this process step by step 😎
NativeWavetableSynthesizer Class
The first thing that we’ll do is to implement the Kotlin side of things. That means creating a class that implements the WavetableSynthesizer interface from the previous video and redirects the calls to its methods to the native (C++) code. This class will be called NativeWavetableSynthesizer class.
As a reminder, here is the WavetableSynthesizer interface from WavetableSynthesizer.kt.
Listing 1.
interface WavetableSynthesizer {
  suspend fun play()
  suspend fun stop()
  suspend fun isPlaying() : Boolean
  suspend fun setFrequency(frequencyInHz: Float)
  suspend fun setVolume(volumeInDb: Float)
  suspend fun setWavetable(wavetable: Wavetable)
}
Package and Import Instructions
To control the native object, NativeWavetableSynthesizer must also be lifecycle-aware. Here is the package and import instructions along with the class declaration.
Listing 2.
package com.thewolfsound.wavetablesynthesizer

import android.util.Log
import androidx.lifecycle.*
import kotlinx.coroutines.Dispatchers
import kotlinx.coroutines.withContext

class NativeWavetableSynthesizer : WavetableSynthesizer, DefaultLifecycleObserver {
To use the DefaultLifecycleObserver, we must add an additional dependency to our app/build.gradle file:
dependencies {
  //...
  implementation "androidx.lifecycle:lifecycle-viewmodel-compose:2.5.0"
}
Native Object Handle and External Functions
In Listing 3, there are member variables and functions listed that are directly connected with the native code.
Listing 3.
private var synthesizerHandle: Long = 0
private val synthesizerMutex = Object()
private external fun create(): Long
private external fun delete(synthesizerHandle: Long)
private external fun play(synthesizerHandle: Long)
private external fun stop(synthesizerHandle: Long)
private external fun isPlaying(synthesizerHandle: Long): Boolean
private external fun setFrequency(synthesizerHandle: Long, frequencyInHz: Float)
private external fun setVolume(synthesizerHandle: Long, amplitudeInDb: Float)
private external fun setWavetable(synthesizerHandle: Long, wavetable: Int)
synthesizerHandle holds the memory address under which the native C++ object is located. As C++ does not have a garbage collector, this object must be explicitly destroyed and its memory freed when its lifetime ends.
synthesizerMutex controls the access to the synthesizerHandle so that it is not modified concurrently.
All the functions declared as external will be implemented in the C++ code. Since they are functions rather than methods, we need to explicitly pass in the pointer to the native object to use it in the native code. We can also pass in additional arguments and obtain return values.
Native Library-Loading Code
To use a native C++ code from Kotlin, we need to load a shared library in the static block of our class.
Since Kotlin does not have a static block, we must use its equivalent: the init block of a companion object.
Note: Although there are a few differences, you may think of members declared inside of a companion object as declared with the static keyword from Java.
In Listing 4, it’s shown how to load our native synthesizer library.
Listing 4.
companion object {
  init {
    System.loadLibrary("wavetablesynthesizer")
  }
}
Lifecycle-Aware Methods
Since NativeWavetableSynthesizer needs to know when it should destroy its native object and we generally should avoid the usage of finalize(), we need a way to be notified when the native synthesizer object may be needed and when not anymore.
For this, we’ll make the NativeWavetableSynthesizer lifecycle-aware, meaning that its parent (in this case, MainActivity) will notify it analogously to the lifecycle methods of the Activity classes in Android.
In this case, we want to construct the native synthesizer when the user opens the app screen (“resumes” the app) and destroy the native synthesizer when the user leaves the app screen (“pauses” the app). These events are signaled with onResume() and onPause() methods of the LifecycleObserver accordingly.
Listing 5.
override fun onResume(owner: LifecycleOwner) {
  super.onResume(owner)

  synchronized(synthesizerMutex){
    Log.d("NativeWavetableSynthesizer", "onResume() called")
    createNativeHandleIfNotExists()
  }
}

override fun onPause(owner: LifecycleOwner) {
  super.onPause(owner)

  synchronized(synthesizerMutex) {
    Log.d("NativeWavetableSynthesizer", "onPause() called")

    if (synthesizerHandle == 0L) {
      Log.e("NativeWavetableSynthesizer", "Attempting to destroy a null synthesizer.")
      return
    }

    // Destroy the synthesizer
    delete(synthesizerHandle)
    synthesizerHandle = 0L
  }
}

private fun createNativeHandleIfNotExists() {
  if (synthesizerHandle != 0L) {
    return
  }

  // create the synthesizer
  synthesizerHandle = create()
}
onResume() method uses a simple helper function that creates the native object if it is not created already.
createNativeHandleIfNotExists() checks if the memory address pointing to the native object is different from 0 (i.e., the object exists). If it does, then the method returns.
If the native object does not exist, the create() external function is called, which creates the native object and returns its memory address. We will implement create() in the C++ code later on. We store the returned handle to be able to access the native object and eventually destroy it.
onPause() method destroys the native synthesizer only if it exists (synthesizerHandle is different from 0). To this end, the delete() external function is called and the object’s memory address handle is zeroed. delete() will be implemented later in C++.
WavetableSynthesizer Methods Implementation
Listing 6 shows the implementation of the WavetableSynthesizer interface methods.
Listing 6.
override suspend fun play() = withContext(Dispatchers.Default){
  synchronized(synthesizerMutex){
    createNativeHandleIfNotExists()
    play(synthesizerHandle)
  }
}

override suspend fun stop() = withContext(Dispatchers.Default){
  synchronized(synthesizerMutex){
    createNativeHandleIfNotExists()
    stop(synthesizerHandle)
  }
}

override suspend fun isPlaying(): Boolean = withContext(Dispatchers.Default){
  synchronized(synthesizerMutex){
    createNativeHandleIfNotExists()
    return@withContext isPlaying(synthesizerHandle)
  }
}

override suspend fun setFrequency(frequencyInHz: Float) = withContext(Dispatchers.Default){
  synchronized(synthesizerMutex){
    createNativeHandleIfNotExists()
    setFrequency(synthesizerHandle, frequencyInHz)
  }
}

override suspend fun setVolume(volumeInDb: Float) = withContext(Dispatchers.Default){
  synchronized(synthesizerMutex){
    createNativeHandleIfNotExists()
    setVolume(synthesizerHandle, volumeInDb)
  }
}

override suspend fun setWavetable(wavetable: Wavetable) = withContext(Dispatchers.Default){
  synchronized(synthesizerMutex){
    createNativeHandleIfNotExists()
    setWavetable(synthesizerHandle, wavetable.ordinal)
  }
}
Each method:
- Takes the mutex that protects the native handle.
- Creates the synthesizer if it does not exist.
- Calls the corresponding native function.
All these calls happen in the Default execution context of Kotlin coroutines (remember that the WavetableSynthesizer interface marked its methods as suspended so that we can use coroutines not to block the UI thread).
The Default dispatcher uses a thread pool of JVM threads to dispatch the given operation. Thanks to it, we move the execution of the methods of NativeWavetableSynthesizer to other threads than the main (UI) thread and, thus, not block the UI (and cause an “App not responding” message).
You may be wondering:
- Why do we need to use the mutex at all?
- Why do we need to check if the synthesizer exists? Shouldn’t
onResume()andonPause()suffice?
The answer to question number 1 is relatively straightforward: we want to make sure that the synthesizer is not destroyed while we are still doing some operations on it. Otherwise, we may attempt to use an already freed part of memory what will result in heap corruption or worse.
The answer to question number 2 is somewhat funny though: I found in my tests that sometimes chaotic things happen at app startup and so some methods may be called when the synthesizer is not constructed. It sounds weird, I know… If you happen to think of a better solution, just let me know 😉
Native C++ Code
After preparing the Kotlin part, we may now proceed to the C++ part.
For now, we will not implement any audio features; we merely want to check that our code works. For this, we will build a native analog of the LoggingWavetableSynthesizer ; each C++ function will simply log that it has been called and print its arguments’ values.
Alongside the java folder in your app module, we will create a cpp folder with a wavetablesynthesizer-native-lib.cpp and CMakeLists.txt files.
The easiest way to do it is to right-click your app module in the Android Studio’s “Android” project view and click “Add C++ To Module” and then “OK”.
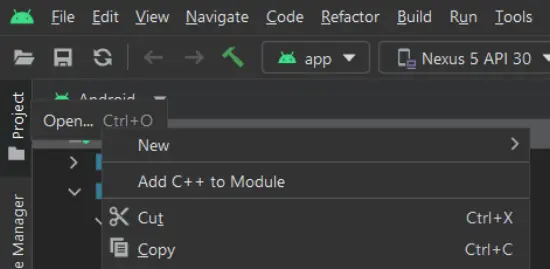
Figure 2. “Add C++ To Module” option of Android Studio.
You can then rename the created test.cpp file to wavetablesynthesizer-native-lib.cpp but everything else will be handled for you.
We’re ready to start developing the C++ code on Android!
wavetablesynthesizer-native-lib.cpp
In the wavetablesynthesizer-native-lib.cpp, we will put the implementation of the methods previously declared as external.
Included headers
Listing 7 shows the included headers and the extern "C" { linkage specification.
Listing 7.
#include <jni.h>
#include <memory>
#include "Log.h"
#include "WavetableSynthesizer.h"

extern "C" {
jni.h header is provided by Android’s Native Development Kit (NDK). The memory header is needed for using std::make_unique. Log.h contains the LOGD logging macro and will be created by us later on in this tutorial. WavetableSynthesizer.h header contains the definition of the WavetableSynthesizer C++ class, which we will also shortly create.
Finally, extern "C" linkage specification states that the functions declared in the following scope have C linkage, i.e., they can be called from the C language. That enforces some constraints on the C++ compiler and allows the functions to be used with JNI.
create() Function
Listing 8 shows the implementation of the create() function.
The create() function creates the WavetableSynthesizer C++ class from the wavetablesynthesizer namespace. We use make_unique to ensure proper destruction in case of an exception (that’s a good practice to follow).
Listing 8.
JNIEXPORT jlong JNICALL
Java_com_thewolfsound_wavetablesynthesizer_NativeWavetableSynthesizer_create(
    JNIEnv* env,
    jobject obj) {
  auto synthesizer =
      std::make_unique<wavetablesynthesizer::WavetableSynthesizer>();

  if (not synthesizer) {
    LOGD("Failed to create the synthesizer.");
    synthesizer.reset(nullptr);
  }

  return reinterpret_cast<jlong>(synthesizer.release());
}
After the synthesizer has been constructed we check if the construction succeeded. If not, we use the LOGD macro to log the failure and ensure that the synthesizer unique pointer does not contain a value other than nullptr. Finally, we return the address of the allocated object by releasing the ownership of the synthesizer (so that it is not destroyed after returning from create()) and casting it to a jlong value understood by Java and Kotlin. This value is used as a native handle in the calling Kotlin class.
Take a moment to look at the signature of this function. It consists of the following elements:
JNIEXPORTdeclaration,- return type,
JNICALLspecification,- name of the
externalfunction specified asJava_package_name_KotlinClassName_functionName; if we get that right, Android Studio should display it in a more friendly format, - arguments:
JNIEnvobject, which gives us access to the Java Virtual Machine interface,jobjectwhich points to the object calling the native function,- any other arguments passed to the function.
create()does not have any arguments so there are no more arguments than the 2 above.
The signatures of these functions are crucial; if we make a mistake, JVM will fail to call the correct function.
delete() Function
Listing 9 shows the delete() function which destroys the native synthesizer object.
Listing 9.
JNIEXPORT void JNICALL
Java_com_thewolfsound_wavetablesynthesizer_NativeWavetableSynthesizer_delete(
    JNIEnv* env,
    jobject obj,
    jlong synthesizerHandle) {
  auto* synthesizer =
      reinterpret_cast<wavetablesynthesizer::WavetableSynthesizer*>(
          synthesizerHandle);

  if (not synthesizer) {
    LOGD("Attempt to destroy an unitialized synthesizer.");
    return;
  }

  delete synthesizer;
}
The first line of this function is the most important. It contains a recipe on how to retrieve a pointer to the native object from a jlong argument. If the casting fails, we log the failure and return from the function; there isn’t anything more we can do. Otherwise, we call the destructor and free the memory occupied by the object by using the delete keyword.
Remaining Functions
All the remaining functions are rather straightforward. They
- Retrieve the pointer to the native object as in the
delete()function. - (Optionally: adjust the arguments to have correct types, for example, cast
jfloattofloat). - Check if the synthesizer exists: if it does, they call the appropriate function. Otherwise, they log the failure and return, sometimes with a default return value.
Listing 10.
JNIEXPORT void JNICALL
Java_com_thewolfsound_wavetablesynthesizer_NativeWavetableSynthesizer_play(
    JNIEnv* env,
    jobject obj,
    jlong synthesizerHandle) {
  auto* synthesizer =
      reinterpret_cast<wavetablesynthesizer::WavetableSynthesizer*>(
          synthesizerHandle);

  if (synthesizer) {
    synthesizer->play();
  } else {
    LOGD(
        "Synthesizer not created. Please, create the synthesizer first by "
        "calling create().");
  }
}

JNIEXPORT void JNICALL
Java_com_thewolfsound_wavetablesynthesizer_NativeWavetableSynthesizer_stop(
    JNIEnv* env,
    jobject obj,
    jlong synthesizerHandle) {
  auto* synthesizer =
      reinterpret_cast<wavetablesynthesizer::WavetableSynthesizer*>(
          synthesizerHandle);

  if (synthesizer) {
    synthesizer->stop();
  } else {
    LOGD(
        "Synthesizer not created. Please, create the synthesizer first by "
        "calling create().");
  }
}

JNIEXPORT jboolean JNICALL
Java_com_thewolfsound_wavetablesynthesizer_NativeWavetableSynthesizer_isPlaying(
    JNIEnv* env,
    jobject obj,
    jlong synthesizerHandle) {
  auto* synthesizer =
      reinterpret_cast<wavetablesynthesizer::WavetableSynthesizer*>(
          synthesizerHandle);

  if (not synthesizer) {
    LOGD(
        "Synthesizer not created. Please, create the synthesizer first by "
        "calling create().");
    return false;
  }

  return synthesizer->isPlaying();
}

JNIEXPORT void JNICALL
Java_com_thewolfsound_wavetablesynthesizer_NativeWavetableSynthesizer_setFrequency(
    JNIEnv* env,
    jobject obj,
    jlong synthesizerHandle,
    jfloat frequencyInHz) {
  auto* synthesizer =
      reinterpret_cast<wavetablesynthesizer::WavetableSynthesizer*>(
          synthesizerHandle);
  const auto nativeFrequency = static_cast<float>(frequencyInHz);

  if (synthesizer) {
    synthesizer->setFrequency(nativeFrequency);
  } else {
    LOGD(
        "Synthesizer not created. Please, create the synthesizer first by "
        "calling create().");
  }
}

JNIEXPORT void JNICALL
Java_com_thewolfsound_wavetablesynthesizer_NativeWavetableSynthesizer_setVolume(
    JNIEnv* env,
    jobject obj,
    jlong synthesizerHandle,
    jfloat volumeInDb) {
  auto* synthesizer =
      reinterpret_cast<wavetablesynthesizer::WavetableSynthesizer*>(
          synthesizerHandle);
  const auto nativeVolume = static_cast<float>(volumeInDb);

  if (synthesizer) {
    synthesizer->setVolume(nativeVolume);
  } else {
    LOGD(
        "Synthesizer not created. Please, create the synthesizer first by "
        "calling create().");
  }
}

JNIEXPORT void JNICALL
Java_com_thewolfsound_wavetablesynthesizer_NativeWavetableSynthesizer_setWavetable(
        JNIEnv* env,
        jobject obj,
        jlong synthesizerHandle,
        jint wavetable) {
    auto* synthesizer =
            reinterpret_cast<wavetablesynthesizer::WavetableSynthesizer*>(
                    synthesizerHandle);
    const auto nativeWavetable = static_cast<wavetablesynthesizer::Wavetable>(wavetable);

    if (synthesizer) {
        synthesizer->setWavetable(nativeWavetable);
    } else {
        LOGD(
                "Synthesizer not created. Please, create the synthesizer first by "
                "calling create().");
    }
}
} // extern "C"
WavetableSynthesizer C++ Class
The C++ WavetableSynthesizer class mirrors the WavetableSynthesizer interface (well, because it is its implementation via the NativeWavetableSynthesizer). Therefore, its class declaration (in file app/src/main/cpp/include/WavetableSynthesizer.h) should not come as a surprise.
It is shown in Listing 11.
Listing 11.
#pragma once

namespace wavetablesynthesizer {
enum class Wavetable {
  SINE, TRIANGLE, SQUARE, SAW
};

class WavetableSynthesizer {
public:
  void play();
  void stop();
  bool isPlaying();
  void setFrequency(float frequencyInHz);
  void setVolume(float volumeInDb);
  void setWavetable(Wavetable wavetable);

private:
  bool _isPlaying = false;
};
}
The only point worth mentioning here is that we need to define the Wavetable enum again, which is bad in the sense that now we have 2 definitions (one in Kotlin and one in C++), which must be equivalent.
A solution to this would be to define Wavetable in a separate file and have the Kotlin and C++ definitions generated before the compilation. However, this would be an overkill for this tutorial and so we’ll stick to this simplified, error-prone version.
Listing 12 shows the implementation of the member functions from the header file in the app/src/main/cpp/WavetableSynthesizer.cpp file.
Listing 12.
#include "Log.h"
#include "WavetableSynthesizer.h"

namespace wavetablesynthesizer {
bool WavetableSynthesizer::isPlaying() {
  LOGD("isPlaying() called.");
  return _isPlaying;
}

void WavetableSynthesizer::play() {
  LOGD("play() called.");
  _isPlaying = true;
}

void WavetableSynthesizer::setFrequency(float frequencyInHz) {
  LOGD("Frequency set to %.2f Hz.", frequencyInHz);
}

void WavetableSynthesizer::setVolume(float volumeInDb) {
  LOGD("Volume set to %.2f dBFS.", volumeInDb);
}

void WavetableSynthesizer::setWavetable(Wavetable wavetable) {
  LOGD("Wavetable set to %d.", static_cast<int>(wavetable));
}

void WavetableSynthesizer::stop() {
  LOGD("stop() called.");
  _isPlaying = false;
}
} // namespace wavetablesynthesizer
As you can see, each method simply logs that it was called and what argument had been passed in. I’ve also implemented the “is playing” state to maintain coherency with the UI.
Log.h header
The Log.h header in app/src/main/cpp/include folder (Listing 13) provides a simple macro for logging to the Logcat of Android Studio. It is a useful tool for debugging because using a debugger in Android Studio significantly increases the CPU and RAM utilization and may be inadequate in a multithreaded code.
The macro is disabled in release builds not to slow down the app (logging can take quite a bit of time). This is controlled using the NDEBUG constant, which is only defined in release builds.
Listing 13.
#pragma once

#include <android/log.h>

#ifndef NDEBUG
#define LOGD(args...) \
__android_log_print(android_LogPriority::ANDROID_LOG_DEBUG, "WavetableSynthesizer", args)
#else
#define LOGD(args...)
#endif
android/log.h header contains the __android_log_print function, which takes a log priority constant as its first argument, a label as the second argument, a format string (familiar from the printf function), and its arguments (which may vary in count). The LOGD macro can accept a variable number of arguments, the first of which should be the format string. It Instead of writing a long call to __android_log_print, we can simply use the macro (and automatically turn it off in release builds!).
Logging requires us to link against a native log library of Android NDK. That will be done in the CMakeLists.txt file, which we will edit next.
CMakeLists.txt File
CMake is a build system for C/C++ projects that is highly flexible, widely adopted, and cross-platform. It has a few other characteristics (open-source, etc.) but the three above are the most important for me.
It’s awesome that Android supports CMake because that allows us to compile our C++ library outside of the Android environment (if we wanted to) using the same build file.
As various build systems have various build scripts, CMake uses the CMakeLists.txt file.
Our current CMakeLists.txt file resides in app/src/main/cpp folder and is very simple, as shown in Listing 14. Most of the comments are automatically generated by Android Studio; I left them for your convenience.
Listing 14.
# Sets the minimum version of CMake required to build the native library.
cmake_minimum_required(VERSION 3.18.1)

# Declares and names the project.
project("wavetablesynthesizer")

# Creates and names a library, sets it as SHARED,
# and provides the relative paths to its source code.
# Gradle automatically packages shared libraries with your APK.
# To use the library from Kotlin, we must set it as shared.
add_library( # Sets the name of the library.
             wavetablesynthesizer

             # Sets the library as a shared library.
             SHARED

             # Provides a relative path to your source file(s).
             wavetablesynthesizer-native-lib.cpp
             WavetableSynthesizer.cpp
        )

# Specifies the location of the header files
# where the C++ compiler can find them
include_directories(
        include
)

# Searches for a specified prebuilt library and stores the path as a
# variable. Because CMake includes system libraries in the search path by
# default, you only need to specify the name of the public NDK library
# you want to add. CMake verifies that the library exists before
# completing its build.
find_library( # Sets the name of the path variable.
              log-lib

              # Specifies the name of the NDK library that
              # you want CMake to locate.
              log )

# Specifies libraries CMake should link to your target library. You
# can link multiple libraries, such as libraries you define in this
# build script, prebuilt third-party libraries, or system libraries.
target_link_libraries( # Specifies the target library.
                       wavetablesynthesizer

                       # Links the target library to the log library
					   # (found with find_library)
                       # included in the NDK.
                       ${log-lib} )
App’s build.gradle Adjustments
After using the “Add C++ to Module” option of Android Studio, your app module’s build.gradle file should have been adjusted properly. Below, in Listing 15, I have listed the changes that should have appeared there. The additions invoke the build of the native library before building the app.
Listing 15.
android{
  // ...
  defaultConfig {
  // ...
    externalNativeBuild{
      cmake{
        cppFlags ''
      }
    }
  }
  // ...
  externalNativeBuild{
    cmake{
      path file('src/main/cpp/CMakeLists.txt')
      version '3.18.1'
    }
  }
}
To enable the C++ 20 standard, you can change this line
Listing 16.
cppFlags ''into this line
Listing 17.
cppFlags '-std=c++2a'Now, your native code should compile just fine.
MainActivity.kt Adjustments
The last thing we need to do is to adjust the MainActivity class so that we use the NativeWavetableSynthesizer instead of the LoggingWavetableSynthesizer.
Since our MainActivity class is really small, I will simply paste here the whole code (Listing 18).
Listing 18.
class MainActivity : ComponentActivity() {

  // Changed: instantiate the synthesizer using C++
  private val synthesizer = NativeWavetableSynthesizer()

  private val synthesizerViewModel: WavetableSynthesizerViewModel by viewModels()

  override fun onCreate(savedInstanceState: Bundle?) {
    super.onCreate(savedInstanceState)
    requestedOrientation = ActivityInfo.SCREEN_ORIENTATION_LANDSCAPE

    // Added: add the synthesizer as a lifecycle observer
    lifecycle.addObserver(synthesizer)

    synthesizerViewModel.wavetableSynthesizer = synthesizer
    setContent{
      WavetableSynthesizerTheme{
        Surface(modifier = Modifier.fillMaxSize(),
                color = MaterialTheme.colors.background){
          WavetableSynthesizerApp(Modifier, synthesizerViewModel)
        }
      }
    }
  }

  override fun onDestroy() {
    super.onDestroy()

    // Added: remove the synthesizer as a lifecycle observer on destruction
    lifecycle.removeObserver(synthesizer)
  }

  override fun onResume() {
    super.onResume()
    synthesizerViewModel.applyParameters()
  }
}
The changes since the last part are:
LoggingWavetableSynthesizerinstantiation has been replaced byNativeWavetableSynthesizerinstantiation.- The synthesizer is added as a lifecycle observer in
onCreate()and removed inonDestroy(). This will ensure that theonResume()andonPause()methods ofNativeWavetableSynthesizerwill be called byMainActivity.
Testing
When you now build and run the app, you should be able to see the log messages appearing in the Logcat but this time coming from the C++ WavetableSynthesizer class rather than from the Kotlin LoggingWavetableSynthesizer class.
In the next parts of the tutorial, we will remove this dummy implementation and finally hear something! But first, we need to write code to connect to Android’s audio driver… Which will be the topic of the next part!
Summary
In this part of the Android wavetable synthesizer tutorial, we have learned how to call C++ code from Kotlin on Android.
Specifically, we learned
- what are
externalfunctions in Kotlin, - how to use Java Native Interface with Kotlin,
- how to log to Logcat from C++ code,
- how to compile native libraries for Android using CMake and Gradle, and
- how to handle the construction and destruction of native objects from managed code.
Up next: connecting to Android audio from C++ using the Oboe library!
Comments powered by Talkyard.