Let’s build a lowpass/highpass filter audio plugin from scratch!
Introduction
In this article, I will guide you step-by-step through the process of implementing a lowpass/highpass filter audio plugin with the JUCE C++ framework.
 Figure 1. You will complete building this plugin at the end of this tutorial.
The structure, that we are going to implement, is the allpass-based parametric lowpass/highpass filter from the previous article. If you want, to understand how this structure works and why it is filtering, I invite you to read that article first. This article is purely a plugin implementation of the previously presented algorithm.
Figure 2 shows the audio processing algorithm that we are implementing in JUCE.
 Figure 2. The DSP structure that we are going to implement.
JUCE Framework
The JUCE framework is a C++ framework for building audio plugins and applications. It is very handy in audio plugin creation because it provides wrappers around specific APIs like VST3 or AAX. Therefore, we can write the plugin code once and build plugins for various digital audio workstations (e.g., Reaper, Ableton, ProTools, etc.).
We will use it for convenience.
This tutorial does not assume that you worked in JUCE before.
And if you haven’t, you will learn plenty of useful stuff that you can readily apply in the professional audio programming market 🙂
In the tutorial, I am using JUCE v6.0.5.
So let’s start building our plugin!
Plugin Project Setup in Projucer
After you install JUCE, launch the Projucer app and select File -> New Project.
You should see a window similar to the one in Figure 3.
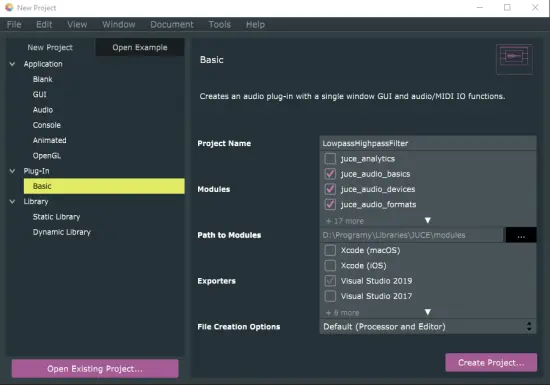 Figure 3. Projucer window.
Choose Plugin->Basic type, write your Project Name, select the target IDE (mine is Visual Studio 2019), and click Create Project.
You then will have to choose the folder which will contain your project folder (mine is called JUCEprojects, since I put there most of my JUCE projects).
At this point, you could already generate your project but you may want to provide some additional metadata. If so, click on the Project Settings (marked 1 in Figure 4) icon next to the project name.
 Figure 4. Setting the parameters of the implemented plugin in Projucer.
For example, I decided to generate only the VST3 plugin format (marked 2 in Figure 4) and use the C++ 20 standard.
After you completed the setup, click on Save and Open in IDE (marked 3 in Figure 4).
JUCE Plugin Project Structure
If you already know JUCE, you can skip this paragraph.
Every JUCE plugin has two main components:
- a plugin processor, and
- a plugin editor.
The plugin processor handles everything related to signal processing within the plugin and does not handle graphical user interface (GUI).
The plugin editor is the main GUI class that allows the developer to create sliders, checkboxes, buttons, etc., and connect them to the plugin parameters.
The plugin processor of our plugin will contain the filtering code. The plugin editor of our plugin will contain the graphical controls and the bindings to the plugin’s parameters.
Audio Processor Value Tree State
A very important class, that we will use in this tutorial, is the AudioProcessorValueTreeState. We can think of it as a container suitable for all our plugin’s parameters.
We can create parameters that will be stored in the value tree state. These parameters can then be bound to specific GUI controls.
We will read those parameters in suitable time and apply them to our filter.
Plugin Architecture
Our plugin will have the following architecture:
LowpassHighpassFilterclass will process sound on the channels that are given to it. It doesn’t know that it is a part of a plugin.LowpassHighpassFilterAudioProcessorwill provide the code necessary to build a plugin. It will provide parameters to the filtering class and pass it the audio buffer for processing. It will also hold anAudioProcessorValueTreeStateclass instance with the plugin parameters.LowpassHighpassFilterAudioProcessorEditorwill hold the GUI controls, position them on the screen, and bind them to the parameters stored in the value tree state.
This architecture is summarized on the diagram below (Figure 5).
 Figure 5. Class diagram of the implemented plugin.
Implementation
We are now ready to implement the plugin.
One more disclaimer before we start: the presented code is not what I consider clean code. I provide this implementation to show you how to implement the effect. You can (and you should) refactor this code into classes and functions as you see fit. I think that for learning purposes, keeping things together makes it more clear. I also don’t use namespaces for simplicity.
With this out of the way, let’s start off with the LowpassHighpassFilter class implementation.
LowpassHighpassFilter Class
The header file with the LowpassHighpassFilter class declaration is shown in Listing 1.
Listing 1. LowpassHighpassFilter class declaration.
// LowpassHighpassFilter.h
#pragma once
#include <vector>
#include "JuceHeader.h"

class LowpassHighpassFilter {
public:
  // setters
  void setHighpass(bool highpass);
  void setCutoffFrequency(float cutoffFrequency);
  void setSamplingRate(float samplingRate);

  // Does not necessarily need to use JUCE's audio buffer
  void processBlock(juce::AudioBuffer<float>&, juce::MidiBuffer&);

private:
  bool highpass;
  float cutoffFrequency;
  float samplingRate;

  // allpass filters' buffers: 1 sample per channel
  std::vector<float> dnBuffer;
};
As you can see, it consists of 3 setters and a sound-processing member function.
The setters are easy to implement, as shown in Listing 2.
Listing 2. Setters of the filter class.
// LowpassHighpassFilter.cpp
#include "LowpassHighpassFilter.h"

void LowpassHighpassFilter::setHighpass(bool highpass) {
  this->highpass = highpass;
}

void LowpassHighpassFilter::setCutoffFrequency(float cutoffFrequency) {
  this->cutoffFrequency = cutoffFrequency;
}

void LowpassHighpassFilter::setSamplingRate(float samplingRate) {
  this->samplingRate = samplingRate;
}
//...
The processBlock() member function is a little bit more complicated.
This is the DSP structure that we want to implement inside of processBlock():
Figure 6. The DSP structure that we are going to implement.
Listing 3 presents the implementation of the above structure.
In Listing 3, I explain every step we take. We don’t use the MidiBuffer argument, so we can skip its name.
Listing 3. Lowpass or highpass filtering of a block of samples.
// LowpassHighpassFilter.cpp continued
//...
void LowpassHighpassFilter::processBlock(juce::AudioBuffer<float>& buffer,
                                         juce::MidiBuffer&) {
  // pi value copied from the web
  constexpr auto PI = 3.14159265359f;

  // resize the allpass buffers to the number of channels and
  // zero the new ones
  dnBuffer.resize(buffer.getNumChannels(), 0.f);

  // if we perform highpass filtering, we need to
  // invert the output of the allpass (multiply it
  // by -1)
  const auto sign = highpass ? -1.f : 1.f;

  // helper variable
  const auto tan = std::tan(PI * cutoffFrequency / samplingRate);
  // allpass coefficient is constant while processing
  // a block of samples
  const auto a1 = (tan - 1.f) / (tan + 1.f);

  // actual processing; each channel separately
  for (auto channel = 0; channel < buffer.getNumChannels(); ++channel) {
    // to access the sample in the channel as a C-style array
    auto channelSamples = buffer.getWritePointer(channel);

    // for each sample in the channel
    for (auto i = 0; i < buffer.getNumSamples(); ++i) {
      const auto inputSample = channelSamples[i];

      // allpass filtering
      const auto allpassFilteredSample = a1 * inputSample +
                                            dnBuffer[channel];
      dnBuffer[channel] = inputSample - a1 * allpassFilteredSample;

      // here the final filtering occurs
      // we scale by 0.5 to stay in the [-1, 1] range
      const auto filterOutput =
          0.5f * (inputSample + sign * allpassFilteredSample);

      // assign to the output
      channelSamples[i] = filterOutput;
    }
  }
}
Ok, this was actually the hardest but also the most interesting bit 🙂
Now, only binding it to the plugin code remains.
Plugin Processor
In the LowpassHighpassFilterAudioProcessor class, we just add some member variables (Listing 4).
Listing 4. Plugin processor class declaration.
// PluginProcessor.h
#include "LowpassHighpassFilter.h"

class LowpassHighpassFilterAudioProcessor : public juce::AudioProcessor
{
//...
private:
    // our plugin's parameters
    juce::AudioProcessorValueTreeState parameters;
    std::atomic<float>* cutoffFrequencyParameter = nullptr;
    std::atomic<float>* highpassParameter = nullptr;

    // the filter implemented in listings 1-3
    LowpassHighpassFilter filter;
};
Here’s where the AudioProcessorValueTreeState comes into play. I set it up according to the official tutorial.
This is shown in Listing 5.
Listing 5. Plugin processor’s constructor.
// PluginProcessor.cpp
LowpassHighpassFilterAudioProcessor::LowpassHighpassFilterAudioProcessor()
#ifndef JucePlugin_PreferredChannelConfigurations
    : AudioProcessor(
          BusesProperties()
#if !JucePlugin_IsMidiEffect
#if !JucePlugin_IsSynth
              .withInput("Input", juce::AudioChannelSet::stereo(), true)
#endif
              .withOutput("Output", juce::AudioChannelSet::stereo(), true)
#endif
              ),
#else
    :
#endif
      parameters(*this,
                nullptr,
                juce::Identifier("LowpassAndHighpassPlugin"),
                {std::make_unique<juce::AudioParameterFloat>(
                    "cutoff_frequency",
                    "Cutoff Frequency",
                    juce::NormalisableRange{20.f,
                                            20000.f,
                                            0.1f,
                                            0.2f,
                                            false},
                    500.f),
                 std::make_unique<juce::AudioParameterBool>(
                    "highpass",
                    "Highpass",
                    false)}) {
  cutoffFrequencyParameter =
      parameters.getRawParameterValue("cutoff_frequency");
  highpassParameter = parameters.getRawParameterValue("highpass");
}
//...
In essence, we define the parameters that we need and then retrieve the references to them.
“Cutoff frequency” is the cutoff frequency of our filter in Hz. It is in a range from 20 to 20,000 Hz with a step of 0.1 Hz. The skewFactor argument (0.2 in Listing 5) tells any control bound to that parameter that the values from the lower half of the range should occupy more slider/knob range than just a half. With this, we try to approximate the logarithmic scaling, which is closer to the human perception of frequency.
If “highpass” is set to true, we perform highpass filtering. If not, lowpass filtering.
We retrieve “highpass” as a floating-point variable, so we need to additionally convert it to a bool variable in code as shown later in Listing 7.
In Listing 6, the pre-processing code is placed. We simply set the sampling rate of our filter. We need the sampling rate to calculate the allpass coefficient later on.
Listing 6. prepareToPlay() of the plugin processor is called at a global parameter change.
// PluginProcessor.cpp continued
//...
void LowpassHighpassFilterAudioProcessor::prepareToPlay(
    double sampleRate, int samplesPerBlock) {
  filter.setSamplingRate(static_cast<float>(sampleRate));
}
//...
In the processBlock() member function, we clear the unused channels, retrieve the plugin parameters, set them, and perform the filtering (Listing 7).
Note that we set the parameters before any processing takes place. In other words, we set the parameters at the audio rate. If we did that every 60 ms, we would then have a separate control rate. 60 ms is short enough to be unnoticed by a human listener but long enough to decrease the processing overhead in the audio processing thread.
If we set the parameters directly in some GUI-related code, we could run into the problem of a race condition. The audio thread and the GUI threads must always be properly synchronized. That is, however, a topic for another article…
Listing 7. Plugin processor’s processBlock().
// PluginProcessor.cpp continued
//...
void LowpassHighpassFilterAudioProcessor::processBlock(
    juce::AudioBuffer<float>& buffer, juce::MidiBuffer& midiMessages) {
    // JUCE default code
    juce::ScopedNoDenormals noDenormals;
    auto totalNumInputChannels  = getTotalNumInputChannels();
    auto totalNumOutputChannels = getTotalNumOutputChannels();

    for (auto i = totalNumInputChannels; i < totalNumOutputChannels; ++i)
        buffer.clear (i, 0, buffer.getNumSamples());
    // end of the default code

    // retrieve and set the parameter values
    const auto cutoffFrequency = cutoffFrequencyParameter->load();
    // in C++, std::atomic<T> to T conversion is equivalent to a load
    const auto highpass = *highpassParameter < 0.5f ? false : true;
    filter.setCutoffFrequency(cutoffFrequency);
    filter.setHighpass(highpass);

    // perform the filtering
    filter.processBlock(buffer, midiMessages);
}
//...
Finally, we need to alter the createEditor() member function, because we need to pass the value tree state to the plugin editor (see below). Plugin editor factory method is shown in Listing 8.
Listing 8. createEditor() of the plugin processor.
// PluginProcessor.cpp continued
//...
juce::AudioProcessorEditor*
LowpassHighpassFilterAudioProcessor::createEditor() {
    return new LowpassHighpassFilterAudioProcessorEditor(*this, parameters);
}
//...
That’s it for the plugin processor. Now, let’s finish up with the plugin editor.
Plugin Editor
The graphical interface of our plugin will consist of two components:
- a slider controlling the cutoff frequency, and
- a checkbox determining whether we have a highpass (checkbox checked) or a lowpass (checkbox unchecked).
Figure 7. GUI of the implemented VST3 plugin.
These controls are represented by JUCE Slider and ToggleButton classes.
To connect these controls with the previously defined parameters, we will use attachments: SliderAttachment and ButtonAttachment.
These attachments are bindings that update the value of the attached parameters as soon as their associated controls change.
Additionally, we will need some text labels (Label class).
Listing 9 shows the new plugin editor constructor declaration and the added members.
Listing 9. Plugin editor declaration.
// PluginEditor.h
class LowpassHighpassFilterAudioProcessorEditor
    : public juce::AudioProcessorEditor {
public:
    // altered constructor to receive the value tree state object
    LowpassHighpassFilterAudioProcessorEditor(
        LowpassHighpassFilterAudioProcessor&,
        juce::AudioProcessorValueTreeState& vts);
    //...
private:
    LowpassHighpassFilterAudioProcessor& audioProcessor;
    juce::Slider cutoffFrequencySlider;
    std::unique_ptr<juce::AudioProcessorValueTreeState::SliderAttachment>
        cutoffFrequencyAttachment;
    juce::Label cutoffFrequencyLabel;

    juce::ToggleButton highpassButton;
    std::unique_ptr<juce::AudioProcessorValueTreeState::ButtonAttachment>
        highpassAttachment;
    juce::Label highpassButtonLabel;

    // given by JUCE by default
    JUCE_DECLARE_NON_COPYABLE_WITH_LEAK_DETECTOR(
        LowpassHighpassFilterAudioProcessorEditor)
};
Listing 10 shows the constructor’s implementation.
Each visual component is added to the GUI using the addAndMakeVisible() member function.
We then need to set the parameters of the newly added component, e.g., text or style.
Finally, we initialize each attachment with the name of the parameter contained in the value tree state object and the GUI control it should be attached to.
Note that I didn’t bother to store the names of the plugin parameters in global constants: they are named explicitly in code here and in the plugin processor. For now, it may be ok, but in general, try to put these names into some constant expressions.
At the end of the constructor we set the size of the plugin GUI.
Listing 10. Plugin editor constructor definition.
// PluginEditor.cpp
LowpassHighpassFilterAudioProcessorEditor::
    LowpassHighpassFilterAudioProcessorEditor(
        LowpassHighpassFilterAudioProcessor& p,
        juce::AudioProcessorValueTreeState& vts)
    : AudioProcessorEditor(&p), audioProcessor(p) {
  addAndMakeVisible(cutoffFrequencySlider);
  cutoffFrequencySlider.setSliderStyle(
      juce::Slider::SliderStyle::LinearVertical);
  cutoffFrequencyAttachment.reset(
      new juce::AudioProcessorValueTreeState::SliderAttachment(
          vts, "cutoff_frequency", cutoffFrequencySlider));

  addAndMakeVisible(cutoffFrequencyLabel);
  cutoffFrequencyLabel.setText("Cutoff Frequency",
                               juce::dontSendNotification);

  addAndMakeVisible(highpassButton);
  highpassAttachment.reset(
      new juce::AudioProcessorValueTreeState::
        ButtonAttachment(vts, "highpass", highpassButton));

  addAndMakeVisible(highpassButtonLabel);
  highpassButtonLabel.setText("Highpass", juce::dontSendNotification);

  setSize(200, 400);
}
//...
In the default implementation provided by JUCE, the paint() member function draws “Hello, World!” text on the screen. You can safely remove the line of code responsible for it.
Finally, we need to position our GUI elements inside the window. We do that inside the resized() member function (Listing 11).
Here, X denotes the distance in pixels from the left border of the window and Y the distance in pixels from the top border of the window.
Feel free to tweak these sizes or better yet; explicitly mark the dependencies between them.
Listing 11. resized() member function of the plugin editor.
// PluginEditor.cpp
//...
void LowpassHighpassFilterAudioProcessorEditor::resized() {
  cutoffFrequencySlider.setBounds({15, 35, 100, 300});
  cutoffFrequencyLabel.setBounds({cutoffFrequencySlider.getX() + 30,
                                  cutoffFrequencySlider.getY() - 30,
                                  200, 50});
  highpassButton.setBounds(
      {cutoffFrequencySlider.getX(),
       cutoffFrequencySlider.getY() +
        cutoffFrequencySlider.getHeight() + 15,
       30, 50});
  highpassButtonLabel.setBounds(
      {cutoffFrequencySlider.getX() + highpassButton.getWidth() + 15,
       highpassButton.getY(),
       cutoffFrequencySlider.getWidth() - highpassButton.getWidth(),
       highpassButton.getHeight()});
}
Summary
It is done! Now, you may compile, run, and test your plugin.
The plugin can be loaded into the AudioPluginHost from JUCE or to a digital audio workstation that handles the format you specified at the beginning. I am using Reaper for this purpose.
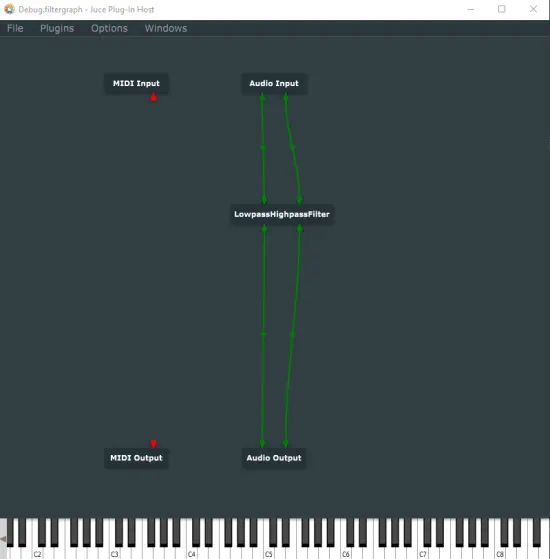 Figure 8. A sample setup of the lowpass/highpass filter plugin in the AudioPluginHost.
If you have any questions or comments, please, leave them in the comment section below 🙂
If you want to learn, how to build audio plugins, subscribe to my newsletter.
And if you found this article useful, please, consider buying me a coffee at buymeacoffee.com/janwilczek ☕ Thanks!
Comments powered by Talkyard.